How to Take Screenshots on macOS
Posted October 14th, 2016 by Hunter S in Tech Tips
Have you ever wanted to take a screenshot on your Mac? It is a very useful feature and something that is quite easy to do with various options in doing so. In this video blog, we will be showing how to take a screenshot along with posting the instructions below.
Video
Key Commands
Shift-Command-3: This key command takes a screenshot of your entire screen and saves it to your desktop.
Shift-Command-4: This key command allows you to click-and-drag your mouse to select a section of the screen. Once the mouse is released, the screenshot of the selected area is saved to your desktop.
Bonus: Shift-Command-4 then Spacebar: After pressing Command-Shift-4 your mouse will become a cross-hair icon to click-and-drag a selection. Instead of clicking your mouse, press and release the Spacebar. Your Mouse will now look like a camera and any application window you hover over will be highlighted. Click once with your mouse and the screenshot of the entire window is saved to your desktop.
Grab Application
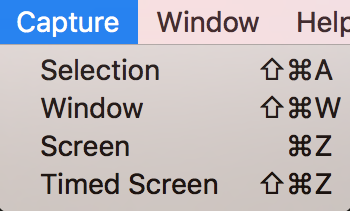
The application, Grab, comes preinstalled on your Mac. This application can be found in the Utilities folder on Finder or in Launchpad. It can also be found by searching in Spotlight for it. Grab allows more options when taking a screenshot. When you launch Grab, it will not open a window like other applications might. However, if you look at the menu bar, it will show the different options for Grab. If you select the Capture tab, it will show you the different options Grab offers for taking a screenshot. Here is a list of the different screenshot options:

1. Selection – This is the same as doing Shift-Command-4 allowing the user to grab the mouse to create a section of where you want to take a screenshot.
2. Window – This option allows for selecting a specific window to have the screenshot of, not the entire screen.
3. Screen – This is the same as doing Shift-Command-3 of taking the screenshot of the entire screen.
4. Timed Screen – This allows a timer to be set of 10 seconds, then the computer will take a screenshot.
Unlike the key commands listed above, Grab does not automatically save a screenshot. After one is taken with Grab, it will show the preview of the screenshot then allow the user to select where the screenshot is saved.
In all, we hope that this has helped you learn how to take a screenshot on macOS. If you have any questions, please do not hesitate to leave a comment below. You can also connect with us on Facebook at facebook.com/WelcomeToCityMac and on Twitter @CityMacTweets.