![]()
AirDrop is the quickest, easiest way to transfer files wirelessly between Apple devices. It’s a simple alternative to emailing yourself a photo or document or uploading it to a cloud service. How you use AirDrop depends on which devices you have and which operating system they are running.
AirDrop Origins
AirDrop was initially introduced as a way for Macs to wirelessly share files in 2011. It was released with Mac OS X Lion (10.7) and works over WiFi - though the Macs don’t necessarily need to be connected to the same WiFi network. In 2013, Apple announced AirDrop as a feature for iOS 7, allowing communication between iPhones, iPads and iPod Touches. It works over a combination of Bluetooth and WiFi, and users can enable it from Control Center. Finally, as a part of new continuity features, OS X Yosemite (10.10) enabled newer Macs to AirDrop with iPhones, iPads and iPod Touches - as well as other Macs.
Why Should I Use AirDrop?
AirDrop is quicker, easier and more efficient than any other file sharing method. It’s instant, doesn’t fill up your email inbox and doesn’t count against cloud storage. It sets up a secure ad-hoc network between devices that are no more than 30-feet apart, ensuring a safe, no-nonsense file transfer.
How to Use AirDrop
On a Mac (Pre-2012)
To Enable (on both Sending and Receiving computer)
- Step 1: Make sure WiFi is turned on.
- Step 2: Go to the AirDrop section of Finder (Go > Airdrop or Cmd-Shift-R). If you don’t see an AirDrop section, your computer is probably incompatible. We’ll look at which models are compatible with AirDrop later in this post.

To Share:
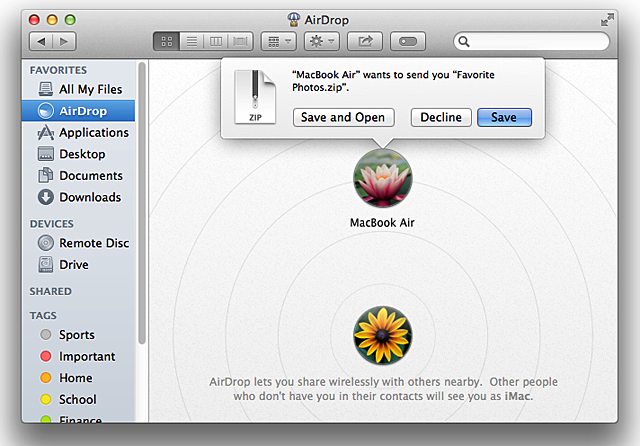
- Step 1: On the sending computer, drag any file to the AirDrop section of Finder, and drop it on to the icon of the receiving computer.
- Step 2: On the receiving computer, click Save or Save and Open to start the transfer.
- Alternatively, right-clicking a file in Finder or on the desktop and selecting Share > AirDrop will prompt an AirDrop dialouge box to appear, where you can select the recipient Mac and send the file.
On iPhone, iPad and iPod Touch
To Enable:
- Step 1: Open Control Center by swiping up from the bottom of your device's screen.
- Step 2: Make sure WiFi and Bluetooth are turned on.
- Step 3: Tap AirDrop (on the left side just below the music controls). There are three options: Off, Contacts Only and Everyone. If you’re concerned about privacy, Contacts Only ensures you’ll only be visible to people you know.
Note: If you don’t see the AirDrop section, your device may not support it. AirDrop only works on devices with a Lightning connector running iOS 7 or later.

To Share:
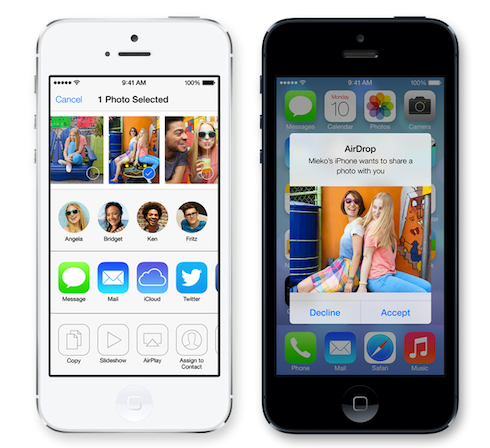
- Step 1: With AirDrop enabled, find a photo, document or webpage you would like to share.
- Step 2: Tap the Share icon. If you are unfamiliar with icon names, check out this post as a guide.
- Step 3: Tap the person or device you want to share with in the AirDrop section above the rest of the sharing options. If you don’t see the correct recipient, make sure they’ve enabled AirDrop. If you’re not in their contacts, make sure they have AirDrop set to “Everyone."
- Step 4: On the receiving device, tap Accept to start the transfer.
Mac (2012 and Later) running OS X 10.10 Yosemite
To Enable:
- Step 1: Make sure WiFi and Bluetooth are turned on.
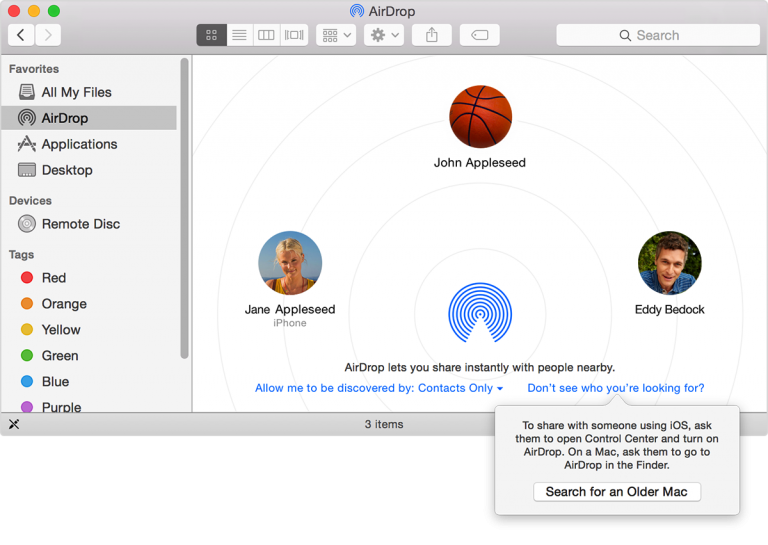
- Step 2: Go to the AirDrop section of finder (Go > Airdrop or Cmd-Shift-R). In the bottom left, you should see blue text that reads “Allow me to be discovered by:” Just like in iOS, this toggles between “Contacts Only” and “Everyone."
- Step 3: You should see all nearby devices with AirDrop enabled, including iPhones, iPads and iPod Touches.
Note: If you’re attempting to share with an older Mac (Pre-2012), click the blue text that reads “Don’t see who you’re looking for?” and click “Search for an Older Mac”.
 To Share:
- Step 1: Drag any file to the AirDrop section, and drop it on a device.
- Step 2: On the receiving device, tap “Accept” or “Save” to start the transfer
AirDrop System Requirements
To see if your Mac works with AirDrop, make sure you’re in the Finder by clicking the desktop (the background area of your screen), or by clicking the Finder icon in the Dock. Then, check to see if AirDrop is listed as an option in the Go menu. If you don't see AirDrop listed, your Mac doesn't support this feature.
In order to transfer files between a Mac and an iPhone, iPad or iPod touch
- your iOS device needs to include a Lightning connector
- your iOS device needs iOS 7 or later installed
- your Mac needs to be a 2012 or later model with OS X Yosemite installed
- Your Mac and iOS device both need Bluetooth and WiFi turned on. You do not have to be connected to a specific WiFi network.
To transfer files between two Mac computers, you need the Mac models listed below with WiFi turned on and OS X Lion or later installed.
- MacBook Pro (Late 2008 or newer)
- MacBook Air (Late 2010 or newer)
- MacBook (Late 2008 or newer)
- iMac (Early 2009 or newer)
- Mac Mini (Mid 2010 or newer)
- Mac Pro (Early 2009 with AirPort Extreme card, or Mid 2010)
Have any questions about using AirDrop? Feel free to leave them in the comments below or reach out to us via web chat. AirDrop is an incredibly simple and elegant solution to quickly sharing content between your Apple devices.