
With the amount of information and suggestive material available on the Internet, it is no surprise that many parents want to restrict their kids’ access to their devices and implement parental controls. The built-in parental controls of the Mac OS X operating system allows you to not only restrict access to the web, but also to certain applications. You can even limit the amount of time your children spend on their devices to certain times of the day and week. Here we will provide you with an overview of the parental control options in OS X and walk you through how to set them up.
Creating a User Account for Your Child
If you have yet to do so already, the first step of implementing parental controls is setting your child up with his or her separate user account. This is important for a few reasons.
- Your child does not have access to any of your documents or data within their user account.
- Having a separate user account for your child allows them to have their own file system within Finder, including seperate iTunes and iPhoto libraries.
- It is difficult to enable parental controls if your child currently uses your personal user account on your computer.
To create a user account, click on the Apple logo in the upper-left hand corner of the desktop. Select “System Preferences…” and then click the “Users & Groups” option that appears in the System Preferences window. In the Users & Groups window, click the lock icon in the lower-left hand corner. You will be asked to enter your administrator password in order to make further changes. Next, click the “+” icon directly above the lock icon to add a new user account.

In the user account creation window, click the “New Account” drop down menu and select the “Managed with Parental Controls” option. Now you can create you child’s account name, password and password hint. The password you create here is one that you will share with your child as they will need it to log on to their account. When you are done entering the information, click the “Create” button to create the account.

Back in the Users & Groups window, select the newly-created account, make sure the “Enable parental controls” option is checked and that the “Allow user to administer this computer” option is unchecked (this prevents your child from changing any parental control settings). Next, click the “Open Parental Controls…” button to begin applying parental controls.
Applying Parental Controls
The Parental Controls window is divided into six categories: Apps, Web, People, Time Limits and Other. Here we will discuss the parental control options within each category.
Apps

Use Simple Finder
The simplified Finder option strips down the traditional view of the Finder app and presents your child with only the most basic options such as Documents, Pictures and Music. It removes your child’s access to system files and folders within Finder.
Limit Applications
This parental control allows you to dictate which applications your child can and can not access. Any apps that are check-marked within this section can be opened under the restricted user account. Any apps that are not selected can still be opened under the restricted account, but you will need to enter your administrator password in order to open them. The “Allow App Store Apps” drop down menu allows you to restrict apps your child can download within the app store based off Apple’s age-rating for those apps.
Prevent the Dock from being modified
When this is enabled, you child cannot manage the apps that are displayed in the Dock.
Website Restrictions
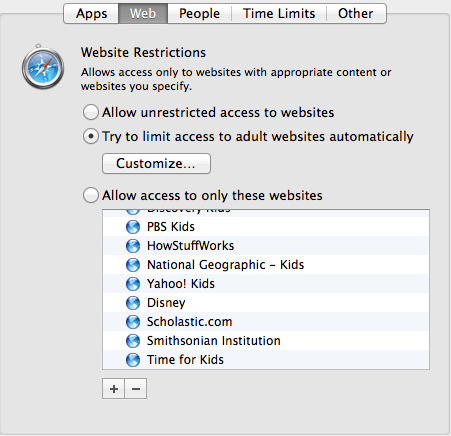
Here, you can manage the sites your child is able to access within Safari. The “Allow unrestricted access to websites” option will not put any restriction filters in Safari. You can choose the “Try to limit access to adult websites automatically” option to apply a built-in adult content filter for Safari. This filter may not block out every site you want, however, so you can choose the “Customize…” option to add URLs to an “always allow access” or “never allow access” list. If your child wishes to go to a site that is blocked, you can allow access by entering your administrator password or by adding the URL to the “always allow access” list. The final option within the Web settings will only allow your child to visit a preset list of websites that you can manage by using the “+” and “-“ buttons to add and delete website URL’s.
People

The People section of Parental Controls allows you to limit who your child communicates with through Game Center, Mail and Messages. The “Send requests to” option will send a notification email to an address of your choice in the case that your child tries to communicate with someone through the Mail app who is not a permitted contact. The “Allowed Contacts” section allows you to add phone numbers and email addresses that are okay for your child to communicate with through the Mail and Messages applications. You can add and delete contacts by using the “+” and “-“ buttons, respectively.
Time Limits

This section allows you to limit the amount of time your child spends on the computer. The first two sections allow you to set a maximum amount of time your child can spend on their computer during weekdays and weekends, respectively. The “Bedtime” option allows you to setup a time range for both school nights and weekends in which your child will not be able to use their computer.
Other Parental Controls

Disable built-in camera: Prevents the user from accessing any built-in cameras and cameras in connected displays
Disable Dictation: Prevents the user from enabling Dictation in the Dictation & Speech preference pane.
Hide profanity in Dictionary: Limits access to inappropriate content in sources such as dictionaries, thesauruses and Wikipedia.
Limit printer administration: Prevents the user from changing printer settings, adding printers and removing printers.
Disable changing the password: Prevents the user from changing their password in the Users and Groups preference pane.
Limit CD and DVD burning: Prevents the user from burning CDs and DVDs in the Finder.
With the proper implementation of parental controls, you can ensure that your child is using their computer in a responsible and appropriate manner. Remember, all of these preferences can be changed at anytime by going to the Users and Groups section of System Preferences. If you have any questions about parental control options on a Mac, please leave us a comment below or reach out to us via our web chat.